
I think this thread is long overdue. What is needed, as I see it, is a one-stop place for all the technical info you'll need to build your own regulator. I'm talking about from regulator to tank. I'm going to give you the low-down on sources for specific components, part numbers, and configurations for various regulator builds--all in one place.
Just a disclaimer: My way is not the only way to do it. Although I invest a lot in top-quality equipment, there are other ways to do the exact same thing. Look at my example as a template. Take it and run in your own direction or adopt it as your own. Regulator building is a creative process.
So, let's begin!
You've already decided to get high quality components ~ Swagelok pipe fittings, a Burkert Solenoid, either a Fabco NV-55-18 or an Ideal Needle Valve. Choosing good components prevents headaches later on down the road. Plus these components look, aesthetically, good together. You won't have weird wires or converters hanging off your rig. Durability is the most important thing next to basic functioning.
Regulators
Ebay is a good place to look for used or surplus units if you are trying to save money. Do so at your own risk.
If you want the peace of mind, buy a new unit with a warranty. Find distributors for the particular brand you are after.
Model numbers vary by maker. A maker's models can vary, too!
Here is a catalog for Victor Specialty Regs.: http://victortechnologies.com/corp_pdfs/56-0874 Victor HPI Catalog.pdf
Replacement Gauges
Email them your model number and which gauge you want to replace. They will be able to order it:
http://jandrweldingsupply.com/
CGA 320 Nut/Nipple (sometimes referred to as a Nut and Stem)
http://www.barrreport.com/showthrea...ms)-and-filters-onliine-for-your-DIY-projects
For those of you wanting to build the old Matheson Model 8s, you'll need a fine threaded CGA stem (same nut):
http://www.regulatortorchrepair.com/store.php/products/cga-320ft-nut-and-nipple
You can also order these from Western Enterprises via Airgas: part number CO-7 (thanks again to S&KGray for the part number)


Burkert Solenoid
*Any of these will work: Part Numbers: 456786 (brass Viton o-ring), 463939 (stainless Buna-N o-ring), or 463938 (brass Buna-N o-ring), 457157 (stainless Viton o-ring). These are type 6011 solenoids. Both Buna-N and Viton are excellent with CO2 gas and liquid.
http://www.iprocessmart.com/Merchan...roduct_Code=BU456786X&Category_Code=4024T6011
https://www.freshwatersystems.com/c-496-solenoid-valves.aspx
http://www.aquariumplants.com/product_p/sol.htm
You can request to have the dealers install a power cord (and pay extra), or you can do it yourself. It's easy!
Here is how:
http://www.barrreport.com/showthread.php/7783-How-to-wire-a-Burkert-type-6011-solenoid
If you do it yourself, you'll want an 18/3 gauge power cord. I usually use a standard 6' length.
Here is how to install the Burkert solenoid correctly. Direction DOES matter: http://www.barrreport.com/showthrea...ow-direction-is-important-in-preventing-leaks
Swagelok pipe fittings ~ part numbers and configurations (90 degree out and VTS-style)
There are two major out-port configurations for Victor regulators: 9 o'clock or the 7 o'clock relative to the regulator body. They measure 1/4" npt. Regulators with a 9 o'clock out-port I call a 90 degree (90*) regulator and those with a 7 o'clock out-port I refer to as "VTS style." It just so happens that with the VTS model regulators gas exits at 7 o'clock and the HPT/SGT500 models at 9 o'clock. Why is this important? Well, you need different parts to get the post body (all the components: needle valve, solenoid, and bubble counter) oriented in the right directions.
So, I'm going to show you the way I configure a VTS type regulator first and a 90* after. After each build, I'm going to provide optional instructions after if you want to run, god forbid, a JBJ bubble counter.
Pipe Fitting Catalog: http://www.swagelok.com/downloads/WebCatalogs/EN/MS-01-147.PDF
Step 1: create an online Swagelok account to order and buy direct. Simple process that takes only a few minutes.
http://www.swagelok.com/?showLogin=N
Enter part number in "search" area on website for pics and ordering.
For stainless steel, substitute "SS" for "B"
(These part numbers are in order from regulator to tube adapter)
VTS250 series type regulator:
B-4-HRN-2
B-2-SE
(solenoid)
B-2-HN
(needle valve)
B-2C2-1/3 (male threaded check valve)
B-6MO-7-2 (tube adapter ~ takes place of JBJ bubble counter)
B-6M5-4M (tube insert)
For directions on how to use Swagelok Tube Adapters, see here: http://www.barrreport.com/showthread.php/8226-How-to-use-Swagelok-tube-fittings
*** SEE POST # 18 Before Ordering ***
B-4-HRN-2
B-2-SE
(Solenoid)
B-2-HN
(Needle Valve)
B-2C2-1/3 (male threaded check valve)
JBJ BUBBLE COUNTER
Should look like this:


HPT/BHT/SGT 500 Series Type Regulator (90*):
SS-4-HLN-2.00
SS-4-RSE-2
(solenoid)
SS-2-ME
(needle valve)
SS-2c2-1/3 (male threaded check valve)
SS-6MO-7-2 (swagelok tube adapter replaces JBJ bubble counter)
SS-6M5-4M (tube insert)
Like this:


Optional:
B-4-HLN-2.00
B-4-RSE-2
SOlenoid
B-2-ME
Needle/Metering Valve
B-2-HN
B-2C2-1/3
JBJ Bubble Counter
The same configuration can be used for the GPT/HPT270 Victor models with a 90* output:
This one has a JBJ bubble counter instead of a Swagelok Tube Adapter:
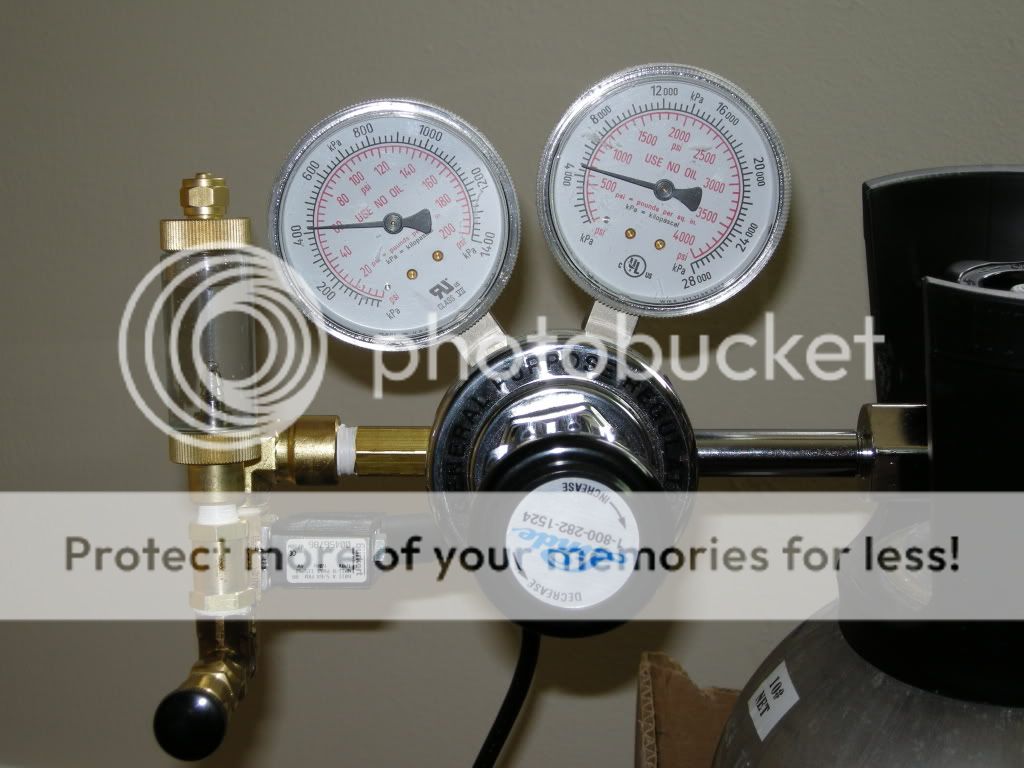
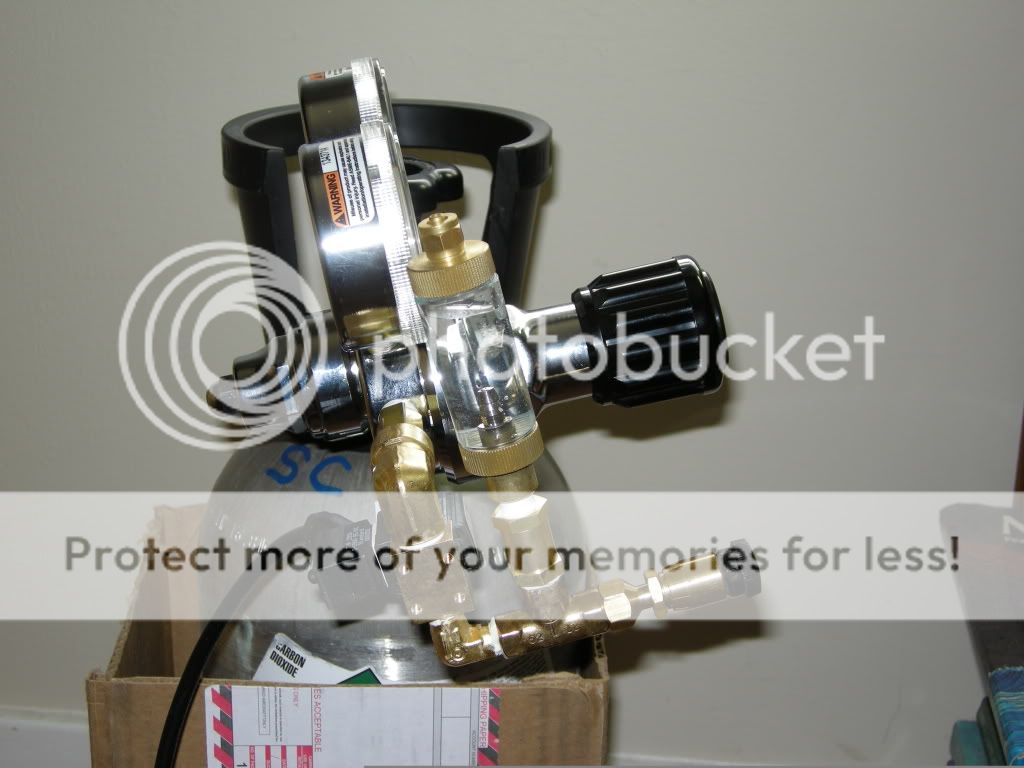
This is my current set-up (a Victor SGT500 with full stainless post body) (notice the Swagelok Tube Adapter instead of a JBJ bubble counter):

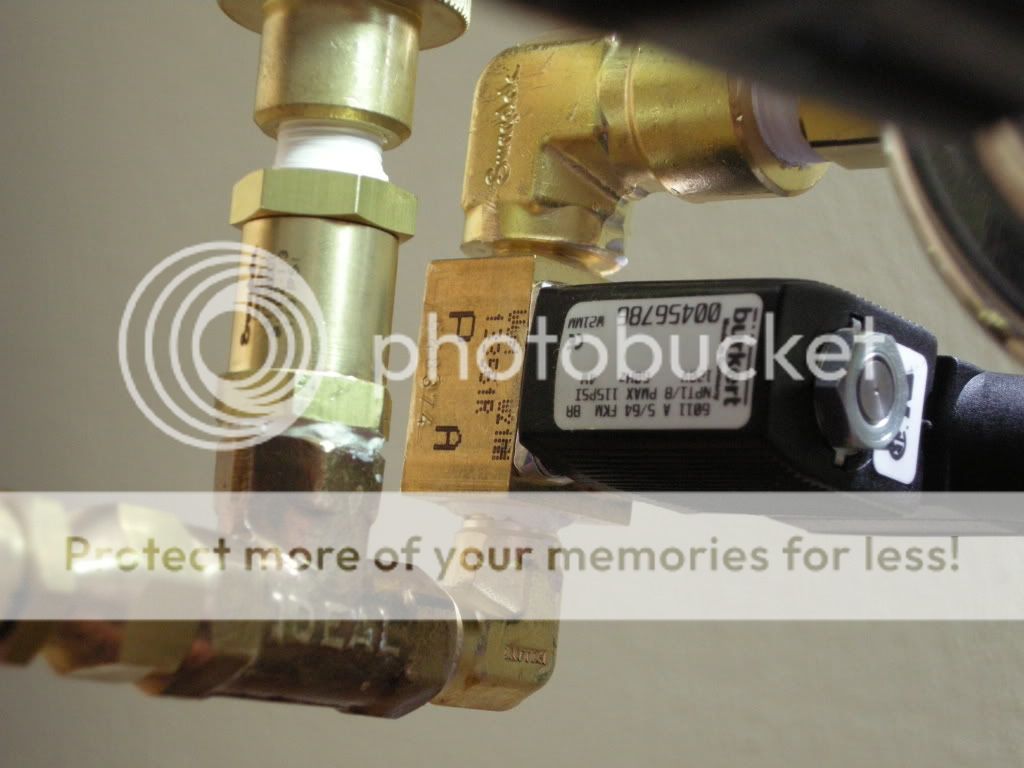
When assembling your components, please be mindful of the gas-flow direction and your Burkert solenoid. If you install the solenoid valve backwards, you can cause leaks. Please see here for clarification: http://www.barrreport.com/showthrea...ow-direction-is-important-in-preventing-leaks
Needle Valves
1/8" NPT is much stronger than 10-32 fittings.
Fabco NV-55-18: http://store.fabco-air.com/proddetail.php?prod=NV-55-18
Ideal Needle Valve:
Stainless: V54-1-12
Brass: V52-1-12
Call Bill Sand to Order over the phone.
(701) 352-1164
[email protected]
Here is how to adjust your Ideal Needle Valve and add/remove the handles:
http://www.barrreport.com/showthread.php/7971-How-to-adjust-your-Ideal-Valve
It's pretty much common knowledge that JBJ bubble counters have crappy check valves built in them. If the valve fails, whatever contents you have in the bubble counter can flood your regulator and cause damage. A way around this problem is to "86" the JBJ bubble counter all together and go for an external unit.
personally I like this set-up:
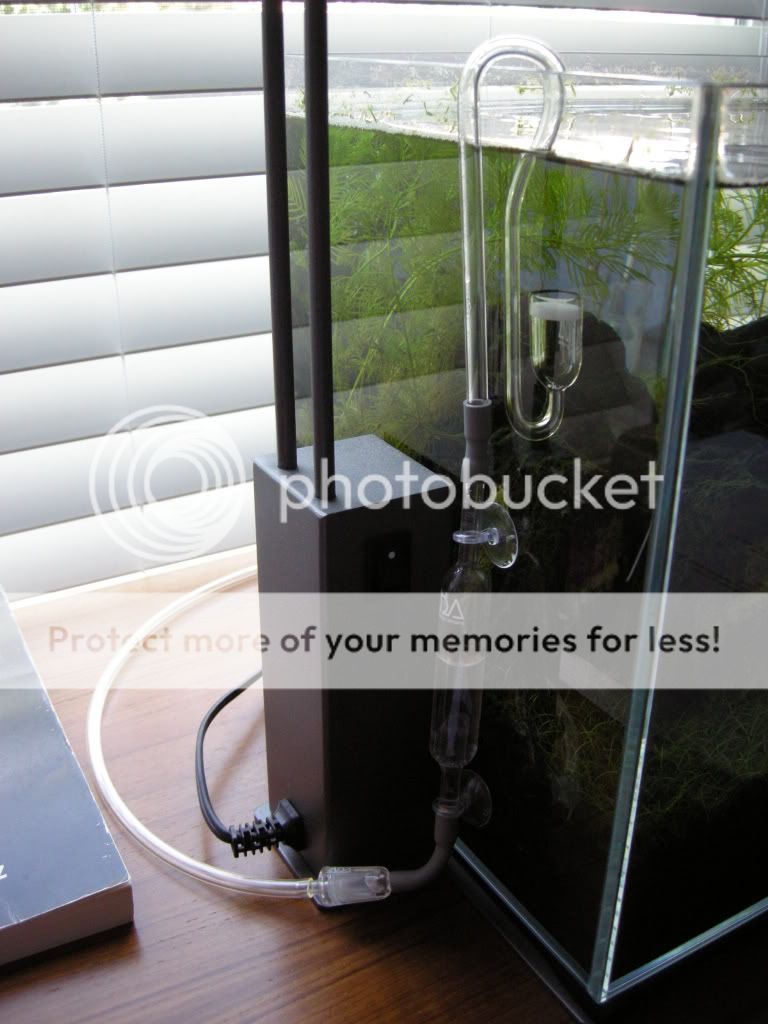
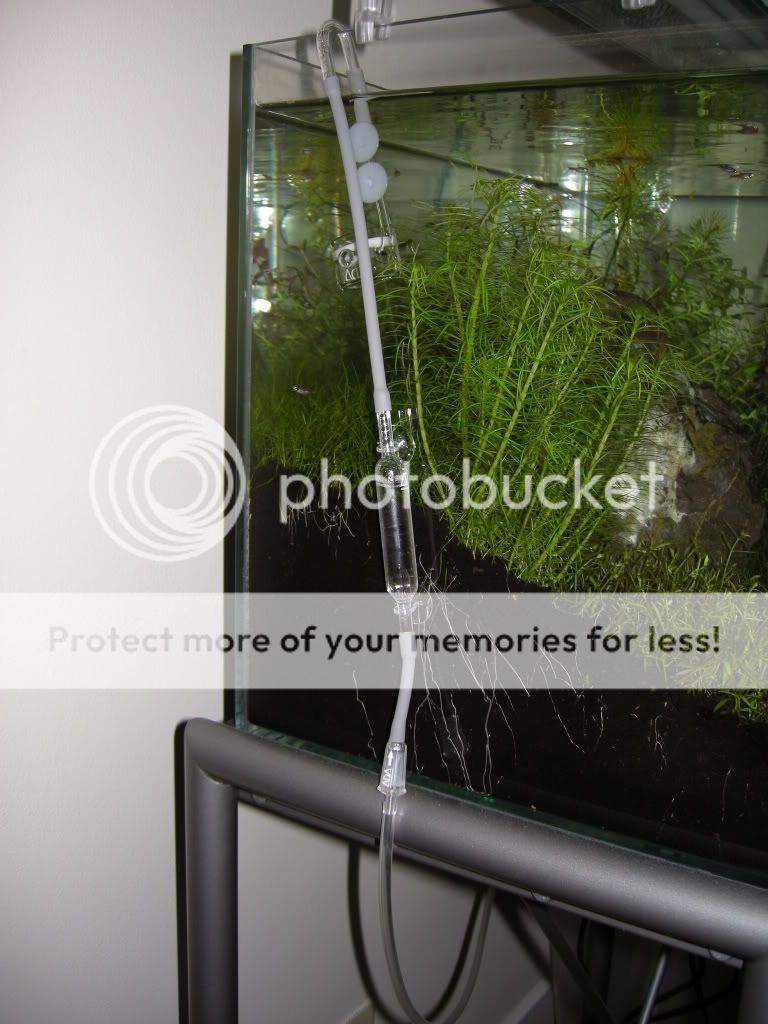

On the regulator end you have the swagelok tube adapter, which uses a ferrule system to "lock" onto the the pressure resistant 4mm/6mm tube. See this thread for pictures of how it works:http://www.barrreport.com/showthread.php/8226-How-to-use-Swagelok-tube-fittings
On the other end, you have the following components:
ADA Gray Parts kit ~ http://www.adana-usa.com/index.php?main_page=product_info&cPath=76_1_53&products_id=65
ADA Clear Parts Kit ~ http://www.adana-usa.com/index.php?main_page=product_info&cPath=76_1_53&products_id=732
These two kits come with the best check valve I've found to prevent aquarium water from migrating down the tubing. This check valve provides the first layer of defense against regulator flooding. The Swagelok check valve (built in the regulator's post body) provides the second layer of defence...especially when used with a JBJ bubble counter. Here is the ADA bugger, which comes in the parts kit http://www.adana-usa.com/index.php?main_page=product_info&cPath=76_1_4&products_id=64
Pressure Resistant Tubing ~ this stuff works well with the Swagelok Tube Adapters! It's 4mm ID / 6mm OD.
http://www.adana-usa.com/index.php?main_page=product_info&cPath=76_1_53&products_id=68
Bubble Counter ~ http://www.adana-usa.com/index.php?main_page=product_info&cPath=76_2_15&products_id=7
To Perma-Seal or not to Perma-Seal?
Personally I like nylon/plastic type seals between my regulator and the CO2 tank. I've had three "PERMA"-seals break on me, so nylon/plastic it is. You can get them on ebay, at aquariumplants.com, or any number of places.
More step-by-step how-tos, check the links I listed on Post # 6.
Just a disclaimer: My way is not the only way to do it. Although I invest a lot in top-quality equipment, there are other ways to do the exact same thing. Look at my example as a template. Take it and run in your own direction or adopt it as your own. Regulator building is a creative process.
So, let's begin!
You've already decided to get high quality components ~ Swagelok pipe fittings, a Burkert Solenoid, either a Fabco NV-55-18 or an Ideal Needle Valve. Choosing good components prevents headaches later on down the road. Plus these components look, aesthetically, good together. You won't have weird wires or converters hanging off your rig. Durability is the most important thing next to basic functioning.
Regulators
Ebay is a good place to look for used or surplus units if you are trying to save money. Do so at your own risk.
If you want the peace of mind, buy a new unit with a warranty. Find distributors for the particular brand you are after.
Model numbers vary by maker. A maker's models can vary, too!
Here is a catalog for Victor Specialty Regs.: http://victortechnologies.com/corp_pdfs/56-0874 Victor HPI Catalog.pdf
Replacement Gauges
Email them your model number and which gauge you want to replace. They will be able to order it:
http://jandrweldingsupply.com/
CGA 320 Nut/Nipple (sometimes referred to as a Nut and Stem)
http://www.barrreport.com/showthrea...ms)-and-filters-onliine-for-your-DIY-projects
For those of you wanting to build the old Matheson Model 8s, you'll need a fine threaded CGA stem (same nut):
http://www.regulatortorchrepair.com/store.php/products/cga-320ft-nut-and-nipple
You can also order these from Western Enterprises via Airgas: part number CO-7 (thanks again to S&KGray for the part number)
Burkert Solenoid
*Any of these will work: Part Numbers: 456786 (brass Viton o-ring), 463939 (stainless Buna-N o-ring), or 463938 (brass Buna-N o-ring), 457157 (stainless Viton o-ring). These are type 6011 solenoids. Both Buna-N and Viton are excellent with CO2 gas and liquid.
http://www.iprocessmart.com/Merchan...roduct_Code=BU456786X&Category_Code=4024T6011
https://www.freshwatersystems.com/c-496-solenoid-valves.aspx
http://www.aquariumplants.com/product_p/sol.htm
You can request to have the dealers install a power cord (and pay extra), or you can do it yourself. It's easy!
Here is how:
http://www.barrreport.com/showthread.php/7783-How-to-wire-a-Burkert-type-6011-solenoid
If you do it yourself, you'll want an 18/3 gauge power cord. I usually use a standard 6' length.
Here is how to install the Burkert solenoid correctly. Direction DOES matter: http://www.barrreport.com/showthrea...ow-direction-is-important-in-preventing-leaks
Swagelok pipe fittings ~ part numbers and configurations (90 degree out and VTS-style)
There are two major out-port configurations for Victor regulators: 9 o'clock or the 7 o'clock relative to the regulator body. They measure 1/4" npt. Regulators with a 9 o'clock out-port I call a 90 degree (90*) regulator and those with a 7 o'clock out-port I refer to as "VTS style." It just so happens that with the VTS model regulators gas exits at 7 o'clock and the HPT/SGT500 models at 9 o'clock. Why is this important? Well, you need different parts to get the post body (all the components: needle valve, solenoid, and bubble counter) oriented in the right directions.
So, I'm going to show you the way I configure a VTS type regulator first and a 90* after. After each build, I'm going to provide optional instructions after if you want to run, god forbid, a JBJ bubble counter.
Pipe Fitting Catalog: http://www.swagelok.com/downloads/WebCatalogs/EN/MS-01-147.PDF
Step 1: create an online Swagelok account to order and buy direct. Simple process that takes only a few minutes.
http://www.swagelok.com/?showLogin=N
Enter part number in "search" area on website for pics and ordering.
For stainless steel, substitute "SS" for "B"
(These part numbers are in order from regulator to tube adapter)
VTS250 series type regulator:
B-4-HRN-2
B-2-SE
(solenoid)
B-2-HN
(needle valve)
B-2C2-1/3 (male threaded check valve)
B-6MO-7-2 (tube adapter ~ takes place of JBJ bubble counter)
B-6M5-4M (tube insert)
For directions on how to use Swagelok Tube Adapters, see here: http://www.barrreport.com/showthread.php/8226-How-to-use-Swagelok-tube-fittings
*** SEE POST # 18 Before Ordering ***
B-4-HRN-2
B-2-SE
(Solenoid)
B-2-HN
(Needle Valve)
B-2C2-1/3 (male threaded check valve)
JBJ BUBBLE COUNTER
Should look like this:
HPT/BHT/SGT 500 Series Type Regulator (90*):
SS-4-HLN-2.00
SS-4-RSE-2
(solenoid)
SS-2-ME
(needle valve)
SS-2c2-1/3 (male threaded check valve)
SS-6MO-7-2 (swagelok tube adapter replaces JBJ bubble counter)
SS-6M5-4M (tube insert)
Like this:
Optional:
B-4-HLN-2.00
B-4-RSE-2
SOlenoid
B-2-ME
Needle/Metering Valve
B-2-HN
B-2C2-1/3
JBJ Bubble Counter
The same configuration can be used for the GPT/HPT270 Victor models with a 90* output:
This one has a JBJ bubble counter instead of a Swagelok Tube Adapter:
This is my current set-up (a Victor SGT500 with full stainless post body) (notice the Swagelok Tube Adapter instead of a JBJ bubble counter):
When assembling your components, please be mindful of the gas-flow direction and your Burkert solenoid. If you install the solenoid valve backwards, you can cause leaks. Please see here for clarification: http://www.barrreport.com/showthrea...ow-direction-is-important-in-preventing-leaks
Needle Valves
1/8" NPT is much stronger than 10-32 fittings.
Fabco NV-55-18: http://store.fabco-air.com/proddetail.php?prod=NV-55-18
Ideal Needle Valve:
Stainless: V54-1-12
Brass: V52-1-12
Call Bill Sand to Order over the phone.
(701) 352-1164
[email protected]
Here is how to adjust your Ideal Needle Valve and add/remove the handles:
http://www.barrreport.com/showthread.php/7971-How-to-adjust-your-Ideal-Valve
It's pretty much common knowledge that JBJ bubble counters have crappy check valves built in them. If the valve fails, whatever contents you have in the bubble counter can flood your regulator and cause damage. A way around this problem is to "86" the JBJ bubble counter all together and go for an external unit.
personally I like this set-up:
On the regulator end you have the swagelok tube adapter, which uses a ferrule system to "lock" onto the the pressure resistant 4mm/6mm tube. See this thread for pictures of how it works:http://www.barrreport.com/showthread.php/8226-How-to-use-Swagelok-tube-fittings
On the other end, you have the following components:
ADA Gray Parts kit ~ http://www.adana-usa.com/index.php?main_page=product_info&cPath=76_1_53&products_id=65
ADA Clear Parts Kit ~ http://www.adana-usa.com/index.php?main_page=product_info&cPath=76_1_53&products_id=732
These two kits come with the best check valve I've found to prevent aquarium water from migrating down the tubing. This check valve provides the first layer of defense against regulator flooding. The Swagelok check valve (built in the regulator's post body) provides the second layer of defence...especially when used with a JBJ bubble counter. Here is the ADA bugger, which comes in the parts kit http://www.adana-usa.com/index.php?main_page=product_info&cPath=76_1_4&products_id=64
Pressure Resistant Tubing ~ this stuff works well with the Swagelok Tube Adapters! It's 4mm ID / 6mm OD.
http://www.adana-usa.com/index.php?main_page=product_info&cPath=76_1_53&products_id=68
Bubble Counter ~ http://www.adana-usa.com/index.php?main_page=product_info&cPath=76_2_15&products_id=7
To Perma-Seal or not to Perma-Seal?
Personally I like nylon/plastic type seals between my regulator and the CO2 tank. I've had three "PERMA"-seals break on me, so nylon/plastic it is. You can get them on ebay, at aquariumplants.com, or any number of places.
More step-by-step how-tos, check the links I listed on Post # 6.
Last edited by a moderator:
